Loading...
Loading...
Loading...
Loading...
Loading...
Loading...
Loading...
Loading...
Loading...
Loading...
Loading...
Loading...
Loading...
Loading...
Loading...
Loading...
Loading...
Loading...
Loading...
Loading...
Loading...
Loading...
Loading...
Loading...
Loading...
Loading...
Loading...
Loading...
Loading...
Loading...
Loading...
Loading...
Loading...
Loading...
Loading...
Loading...
Loading...
Log in to your admin account to set up and manage your account.
You must activate your account by providing your banking information to enable billing for Heyquip fee.
Setting up Stripe is essential for your clients to make transactions and deposits on the platform.
Quickly modify the address, opening hours, or other essential information for your branches with a few clicks.
During your first login to the client portal, you will need to create an account and complete your personal or business information in the Profile section.
Access your rental center’s transactional platform and click on the Account Application tab at the top left of the window.
In the new page that opens, click on Create an account at the bottom of the page.
In the new window, fill in the fields with your email and secure password. Then click on Sign up.
You will need to check your email to confirm your email address.
Find the email titled Confirmation instructions.
Click on Confirm my account.
You will now be logged into your client portal. You can save the link in your bookmarks so you don’t lose it
We need straightforward access to your Stripe account to integrate it with your transactional site, enabling you to receive online deposits.
You need to create a Stripe account to allow your clients to make transactions on the Heyquip transactional platform. Your Stripe account receives and manages online payments made through the platform, then redirects the funds to your financial institution. to create your Stripe account. You will need your banking information.
Access the Admin Portal.
(Need help to access it? )
In the gray sidebar, go to Settings to open your Heyquip account settings page.
Scroll down to the Stripe API Configuration section, then click on Edit.
Paste the two keys (public and secret) from your Stripe account into the corresponding fields
**NOTE: to learn how to access your Stripe account’s API keys.
At Heyquip, we aim to streamline and automate the operations of equipment rental centers, assisting you in boosting efficiency, cutting costs, and providing an outstanding customer experience. We understand the challenges you face, such as managing bookings, payments, inventory, and the need to stand out against larger industry players.
This guide is designed to equip you with the necessary tools to make the most of our platform. Whether you are an owner, manager, or employee, we understand that your time is valuable and you face numerous challenges. This guide will support you in your transition to simplified digital operations.
This guide will help you to:
Understand Heyquip’s essential features and how to use them to manage your digital catalog and mobile interface.
Optimize your operations by automating reservations, payments, and inventory management.
Deliver a better customer experience with convenient booking and payment options.
Train your team effectively with tailored resources.
Stay competitive by keeping up with industry trends and best practices.
At Heyquip, your success is our priority. This guide is a step in our partnership to transform your operations, improve your results, and achieve your goals.
This guide is designed to assist you with reconnecting to your admin account. Make sure you have already created your account and have your password handy.
Access Your Transactional Site
Click on the avatar icon in the top-right corner of the window.
From the dropdown menu, select Login.
You’ll be directed to the login page.
Enter your email address in the designated field.
Enter your password in the appropriate field.
Click on Sign in to your account.
You will now be logged into your account, and the page that appears will be your Heyquip transactional site. To access your admin portal, click on the avatar in the top-right corner again and select Admin from the dropdown menu.
You will then be in your account’s admin portal.
Access the Admin Portal.
(Need help to access it? )
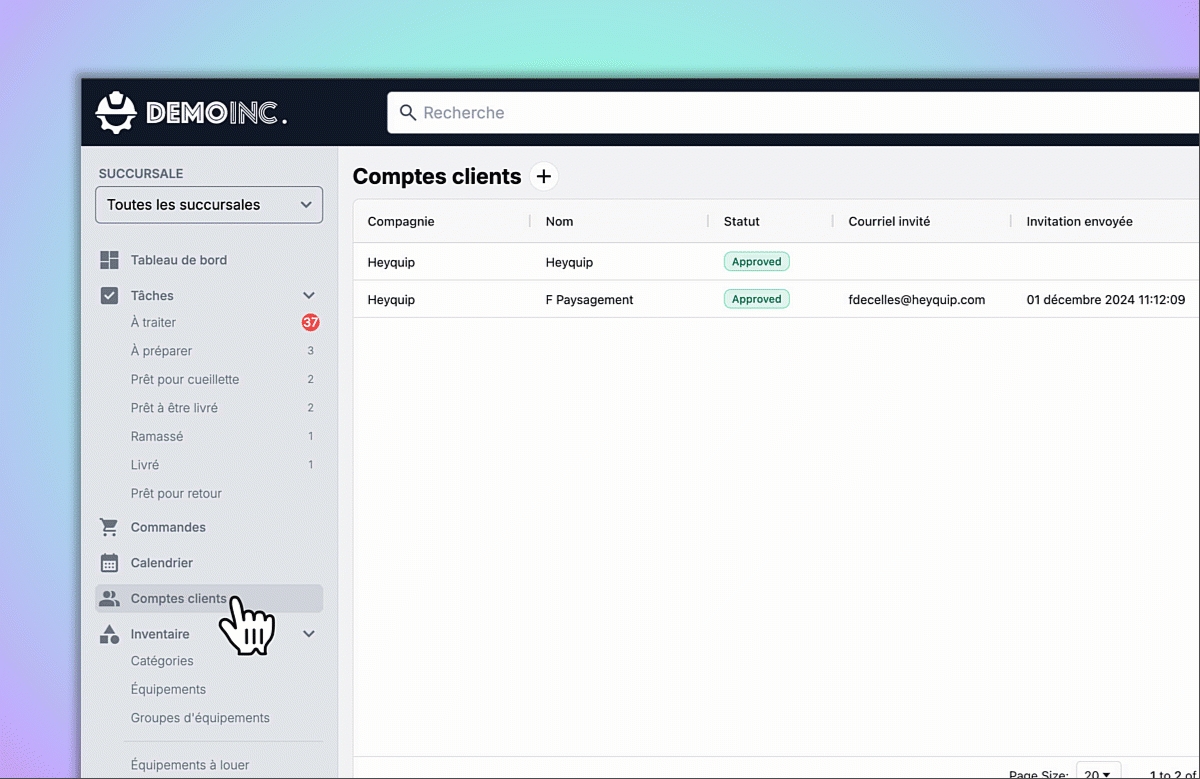
In the grey sidebar, go to Customer Accounts. You will see a list of your customer accounts.
**NOTE : If you have never added customer accounts, the list will be empty.
Click on the + icon next to Customer Accounts.
Enter the email address, then click Send Invite to invite your client to create an account to conduct transactions online.
During your first login to the admin portal, you will need to reset the password that was set when you were added as a platform administrator.
Click on the avatar in the upper right corner, then select Sign In.
On the login page titled Sign in to your account, click on Forgot your password? in the bottom right corner.
Enter your email address and click on Send me reset password instructions.
Check your email for a message titled Instructions for resetting your password.
In the email, click on Change my password.
Enter your new password in the window that opens.
Return to the transactional platform, and click on Login from the avatar dropdown menu in the top-right corner of the screen.
Sign in using your email address and new password.
Once logged in, click on the avatar in the top-right corner again, then select Admin from the dropdown menu. You are now in your admin portal.
Are you an owner or employee of a rental center?
Are you a renter at a rental center?
Enregistrez facilement les paiements au comptoir ou par téléphone tout en assurant une documentation précise pour vos registres comptables.
Access the Admin Portal.
(Need help to access it? Click Here)
Go to Orders in the gray sidebar. You will arrive at your orders list (rentals).
**NOTE : If you have never transacted with the platform, the order history will be empty.
Use the search bar to find the specific order you need.
Double-click on the order line to access the full order details.
Click Add Payment in the bottom-right corner of the page.
Enter the payment amount
Enter a description (optional)
Select a payment method.
Click on Save to record the payment.
You can edit your stores once you've set up your Heyquip account.
Access the Admin Portal.
(Need help to access it? Click Here)
In the gray sidebar, go to Settings to open your Heyquip account settings page.
Scroll to the bottom of the page where you’ll see five black buttons. Click on the Stores button.
Once you're on the store page, click twice on the line of the store you want to edit.
On the store page, click Edit at the bottom to modify the following details:
Name
Address
Location
Hours of Operation
Remember to Save your changes after making them.
Managing your clients should never be complicated.
With Heyquip, all the essential information is at your fingertips, whether it's inviting a client to create an account, completing a payment, or finding an invoice in seconds.
In this section, explore how Heyquip allows you to centralize and organize your customer interactions, ensuring quick access and hassle-free management.
Because smooth management is the key to impeccable customer service and a high-performing business.
Once your admin account is created, you need to configure your Heyquip account to activate it.
Access the Admin Portal.
(Need help to access it? )
In the gray sidebar, go to Settings to open your Heyquip account settings page.
Scroll to the bottom of the page where you’ll see five black buttons. Click on the Heyquip Configuration button.
In the window that appears, enter your credit card number and click Save to activate your account.
Complete Payments
Accessing Invoices
Invite Your Clients
Move your rentals through the process by updating their status, ensuring a clear overview of your operations at all times.
Access the Admin Portal.
(Need help to access it? Click Here)
In the gray sidebar, go to the Tasks section and click on the Tasks button. This will take you to the table of tasks awaiting validation.
Use the dropdown menu to filter tasks by time period. Click on All periods, then select the appropriate time period:
Before today
Today
Tomorrow
This week
In the future
Scroll through the list to locate the desired task.
Double-click the task to open its full details. In the central section, titled according to the task status, click on the black box corresponding to the next step. The task will automatically advance to this stage in the tasks table.
Benefit for a Referred Customer:
Qualified Referrals are eligible to receive their first month of Heyquip transaction fees free of charge.
Duration: The aforementioned free month is valid for a period of thirty (30) days from the activation date of the Storefront.
Eligible Fees: Only Heyquip's transaction fees are included in this offer. This includes the $2 fee applied to all transactions processed through the Heyquip Platform and the 2.7% commission fee applicable to transactions made on the transactional platform.
Excluded Fees: The Heyquiop service fees of 2.7% +2$ on all online transactions are excluded from this discount.
Activation: Storefront activation occurs when the website is made accessible to the public. This means that once the inventory is uploaded to the site and the site is customized to the company's branding, it is considered ready for activation.
Additional Considerations:
The Referral Program may have additional eligibility requirements, such as a minimum transaction volume or a specific referral source.
The free month offer cannot be combined with other promotions or discounts offered by Heyquip.
Heyquip reserves the right to modify or cancel all elements of the Referral Program at any time without notice
Qualified Referral:
A Qualified Referral is defined as a business (a "Referred Customer") who arrives at our website and becomes an active Heyquip customer as a result of sharing your referral email. You are entitled to one reward per Referred Customer, meaning subsequent purchases by the same Referred Customer will not be considered additional Qualified Referrals.
Referred Customer:
The Referred Customer and the Referrer cannot be the same person or be employees for the same business (e.g., by using a different email address). The Referred Customer must not have been a former Heyquip customer.
Referral Rewards:
To earn referral rewards, the Referred Customer must become an active customer of Heyquip.
Reward Payments:
For each Qualified Referral, you will receive a credit of $250, which can be used to cover certain transaction fees as specified herein.
Eligibility Requirements:
To be eligible for the Referral Program, the Referrer must be an active Heyquip customer in good standing. The Referred Customer must be a new business that does not have access to the Heyquip Platform or have a Storefront.
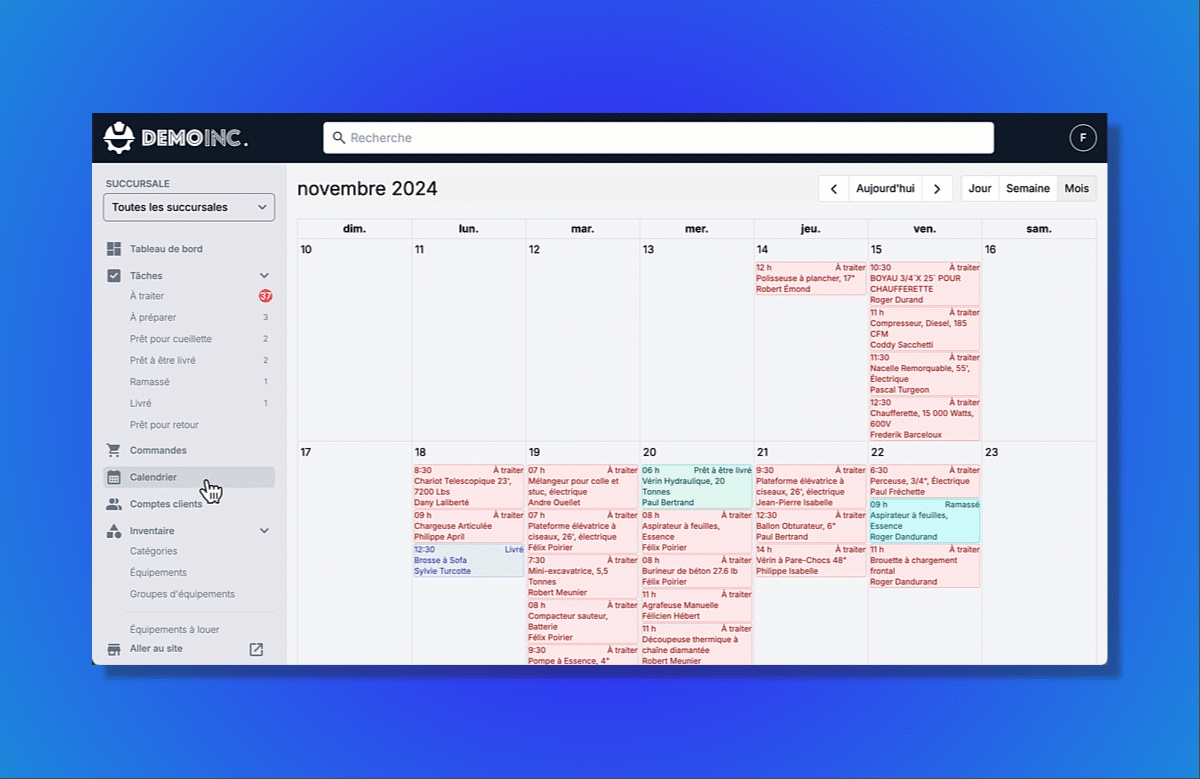
You can view your reservations in a calendar format. Focus on specific time periods or customize the view to suit your preferences.
Access the Admin Portal.
(Need help to access it? Click Here)
In the gray sidebar, go to Calendar. You will see a calendar displaying all ongoing reservations.
An ongoing reservation is a rental that has not yet been returned by the client.
You can choose your preferred view:
Daily
Weekly
Monthly
Simply click on the white boxes in the top-right corner of the window.
You can scroll through the calendar using the arrows located in the top-right corner of the window.
Invite friends, colleagues and family to join Heyquip and benefit from a $295 discount on next month's Heyquip fees.
When you refer a friend, colleague, or family member, they also get a reward. We give them a $295 discount on their first month of Heyquip fees.
Email us at [email protected] to get more information or to refer someone:
Send us an email to say you want to refer someone.
Get an email to forward to your referred person.
Get access to $295 discount on your next month's Heyquip fees

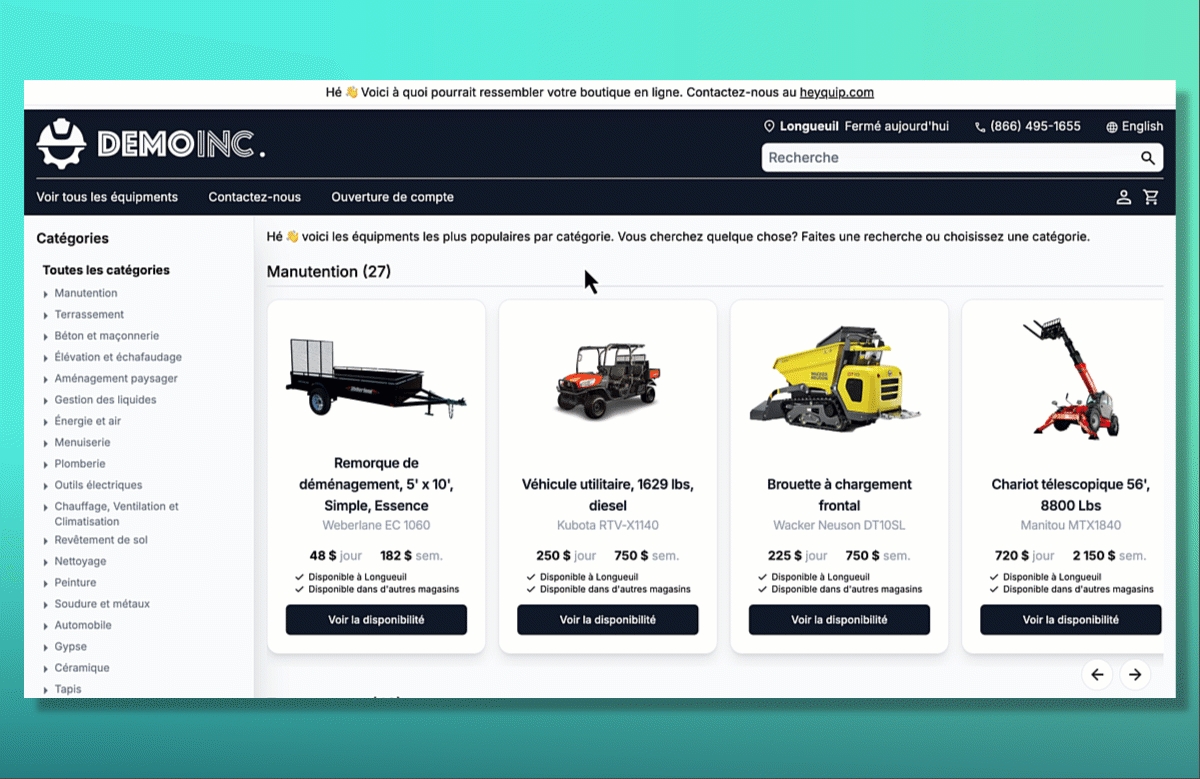
You can manage the inventory displayed on your website in just a few clicks: simply activate or deactivate equipment based on its availability or your operational needs.
Access the Admin Portal.
( Need help to access it? )
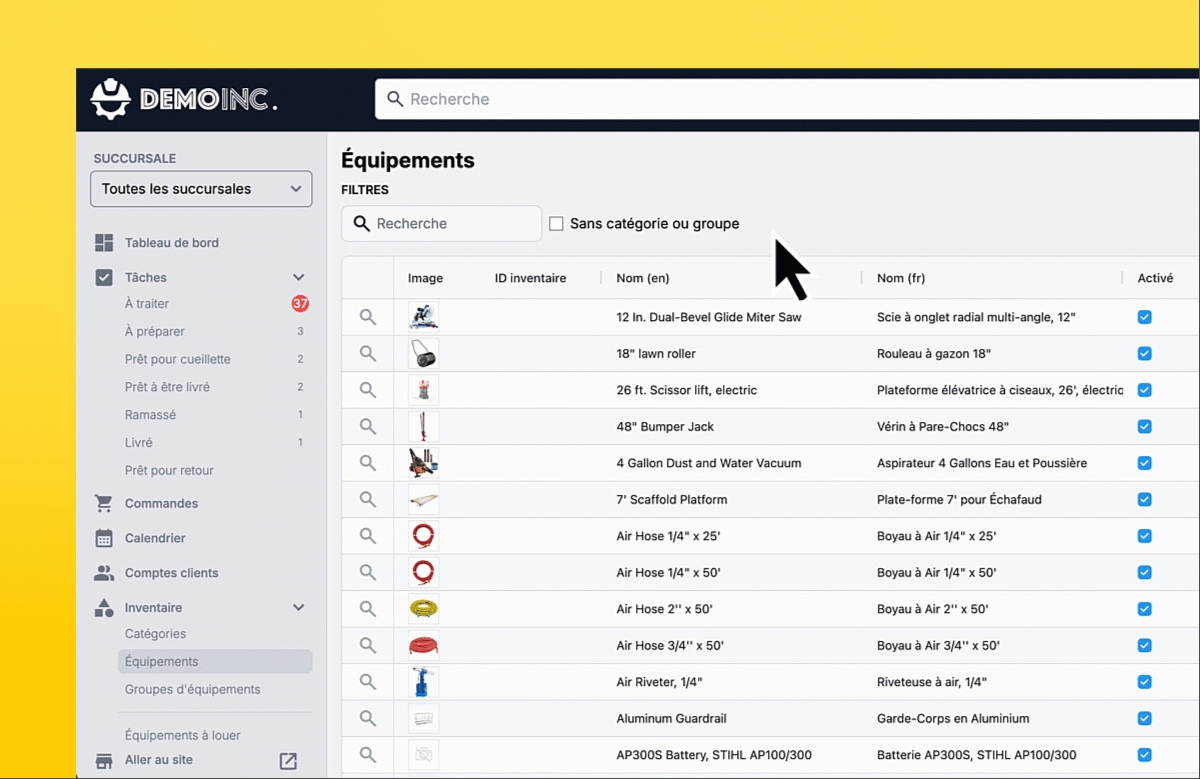
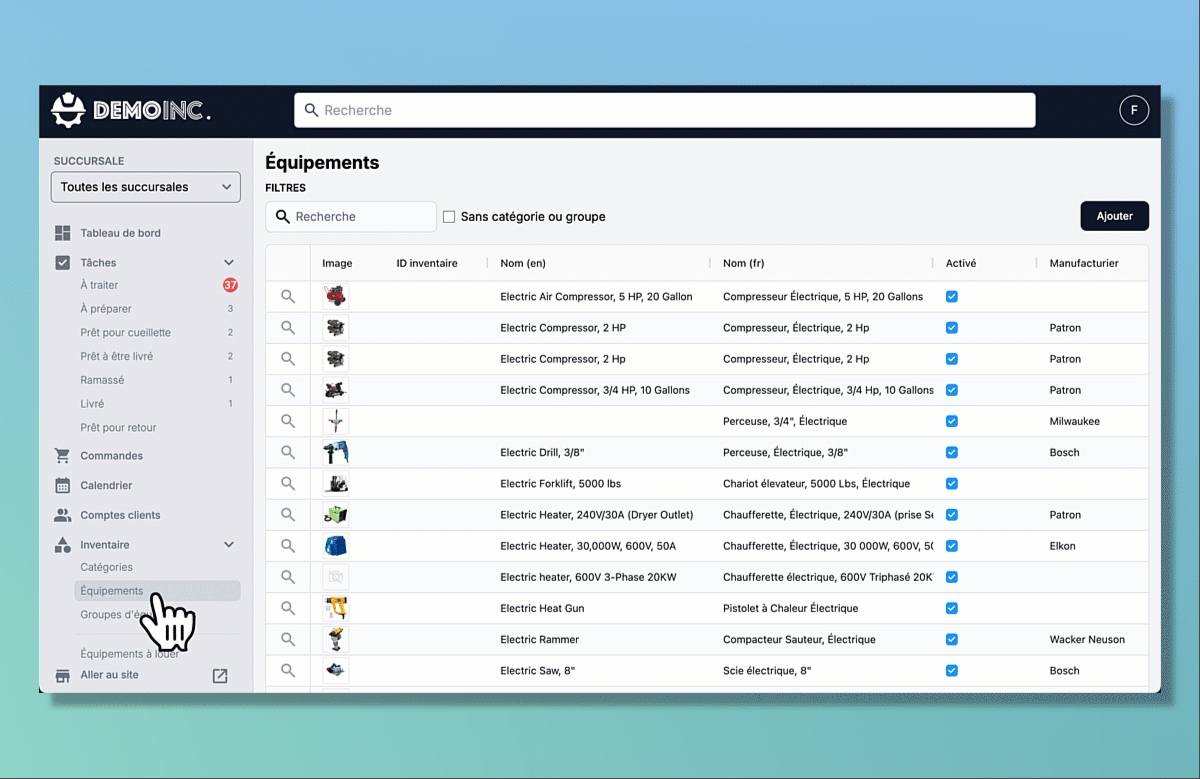
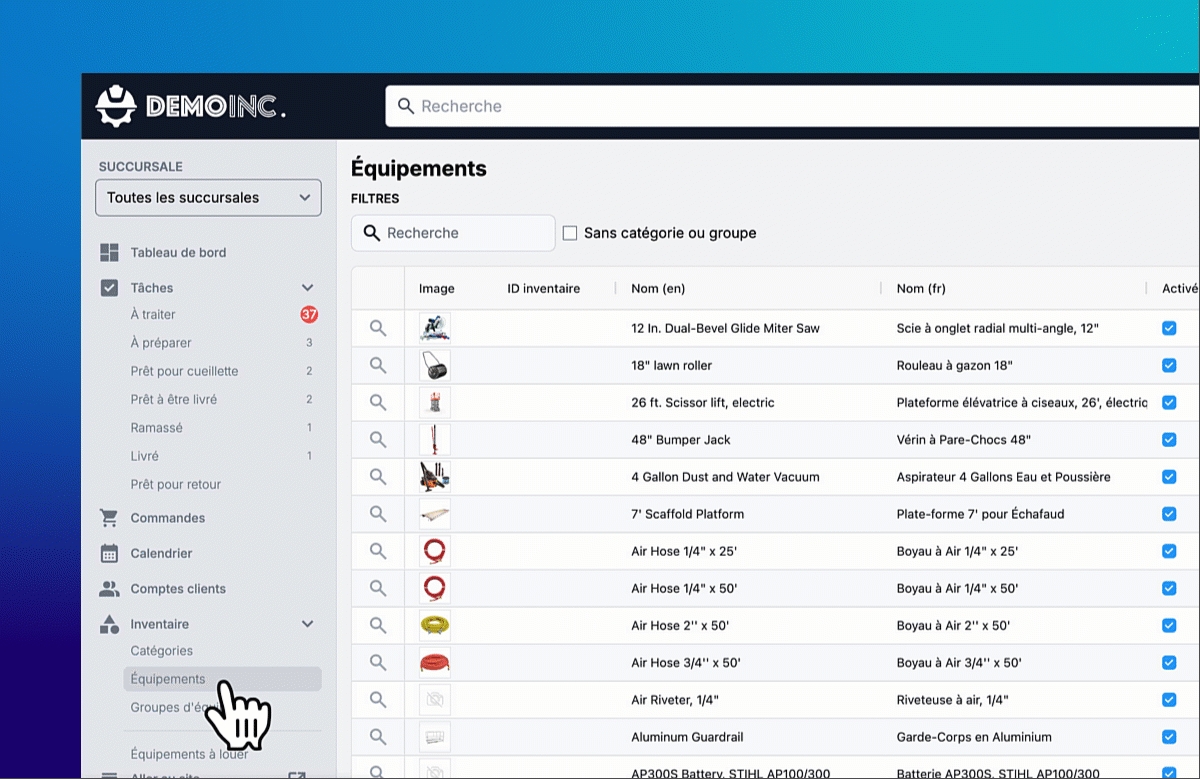
In the gray sidebar, go to Inventory > Equipment. You will arrive at the inventory list.
Use the search bar to find the equipment you want to modify.
Type the name of the equipment in the small search bar at the top of the table.
Press Enter.
Select the equipment you want to modify.
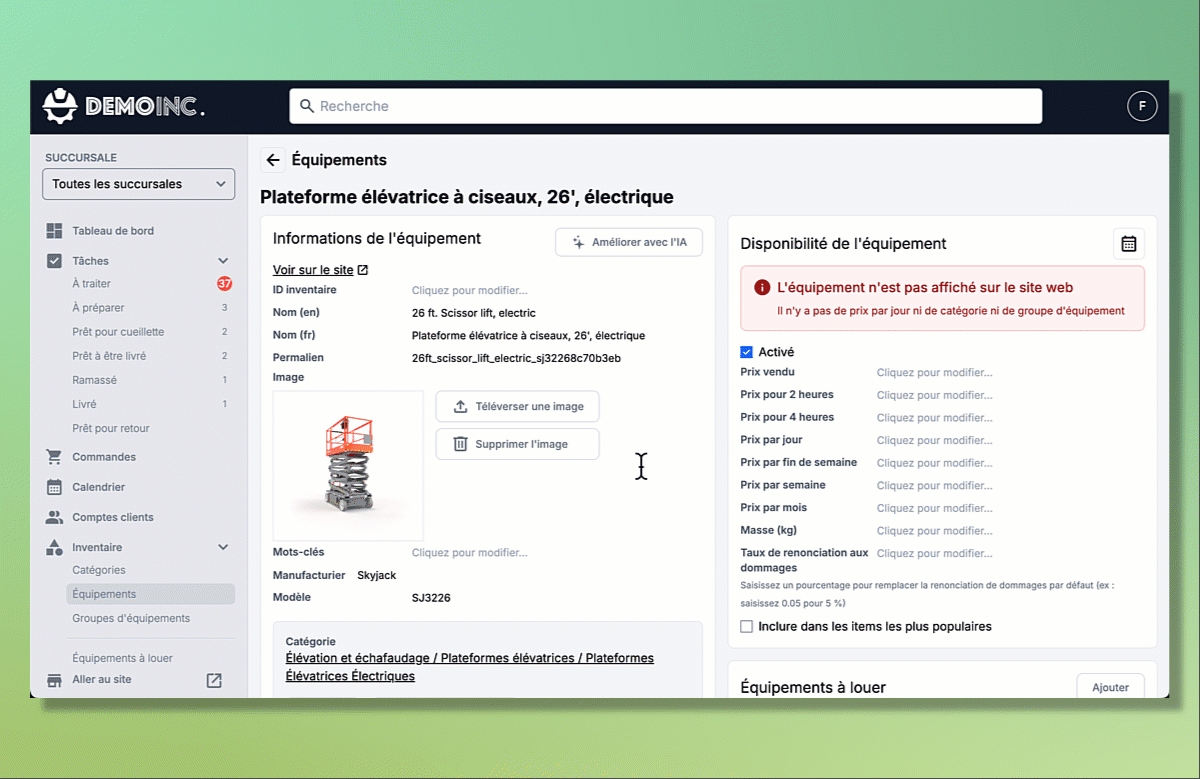
Click on the magnifying glass icon to the left of the row to open the detailed equipment page.
In the Equipment Availability section, uncheck the Activated box.
Blue box: The equipment is active.
Gray box: The equipment is inactive.
Adding equipment to your inventory is quick and easy with Heyquip. The platform simplifies every step and automates the process seamlessly.
Access the Admin Portal.
(Need help to access it? )
In the gray sidebar, go to Inventory > Equipment. You will arrive at the inventory list.
Click on the Add button in the top-right corner of the window.
In the window that opens:
Enter the name in English and French, along with the manufacturer and model.
Click Create to save the new equipment.
You will then be directed to the equipment’s detailed page. To complete its setup, fill in the necessary information:
Add a photo
Assign it to a category
Set the applicable prices
Add inventory for this equipment
In the Equipment to Rent section, click Add, then:
• Enter the inventory ID.
• Enter the serial number (optional).
• Click Create to add inventory for this equipment.
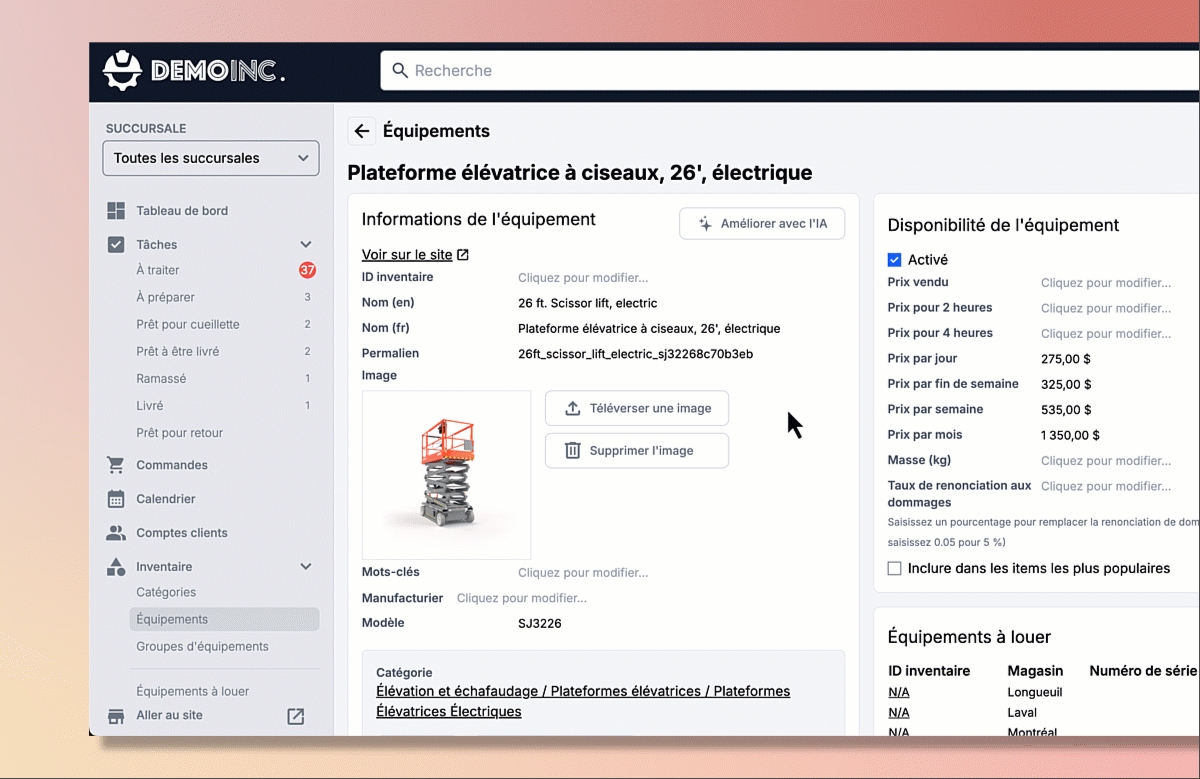
You can easily add descriptions, features, or applications to your equipment. Save time by leveraging artificial intelligence.
Access the Admin Portal.
( Need help to access it? )
In the gray sidebar, go to Inventory > Equipment. You will arrive at the inventory list.
Use the search bar to find the equipment you want to modify.
Type the name of the equipment in the small search bar at the top of the table.
Press Enter.
Select the equipment you want to modify.
Click on the magnifying glass icon to the left of the row to open the detailed equipment page.
In the Equipment Information section, scroll down to locate the following fields:
Description (EN), Description (FR): Click on the field and type the description in English and French.
Features (EN), Features (FR): Click on the field and type the features in English and French.
Applications (EN), Applications (FR): Click on the field and type the applications in English and French.
Easily check the availability calendar for any equipment to plan your reservations in just a few clicks.
Access the Admin Portal.
(Need help to access it? )
In the gray sidebar, go to Inventory > Equipment. You will arrive at the inventory list.
Use the search bar to find the equipment you want to modify.
Type the name of the equipment in the small search bar at the top of the table.
Press Enter.
Select the equipment you want to modify.
Click on the magnifying glass icon to the left of the row to open the detailed equipment page.
In the Equipment Availability box, click the calendar icon in the top-right corner.
Select the desired branch, then use the arrows to scroll through the calendar.
Click the X in the top-right corner when you’re finished with the calendar.
Ensure your inventory is as accurate as possible by adding a model and manufacturer to each piece of equipment.
Access the Admin Portal.
(Need help to access it? )
In the gray sidebar, go to Inventory > Equipment. You will arrive at the inventory list.
Use the search bar to find the equipment you want to modify.
Type the name of the equipment in the small search bar at the top of the table.
Press Enter.
Select the equipment you want to modify.
Click on the magnifying glass icon to the left of the row to open the detailed equipment page.
In the Equipment Information section, locate the Manufacturer and Model fields.
Click on the Manufacturer box to display the dropdown menu and select the correct manufacturer.
Click in the Model box and enter the equipment’s model code.
At Heyquip, we understand that every booking matters and that each minute spent manually managing orders could be better spent elsewhere. That's why our platform allows you to streamline your operations by creating, modifying, and tracking your orders.
Discover in this section how Heyquip helps you organize reservations, avoid inventory conflicts, and maintain control over your operations. A well-oiled system means more time for your clients and more energy to grow your business.
You can create a reservation for a client either at the counter or over the phone.
Access the Admin Portal.
(Need help to access it? )
In the gray sidebar, go to Orders. You will see the list of orders.
Click on the Add button in the top-right corner of the window.
In the window that opens:
Enter the client’s information:
First name
Last name
Email address
Phone number
Company (optional)
Click Save.
You will then be redirected to the order details page. Click on + Rental or + Purchase to add equipment to the order.
In the Add Equipment to Order window:
Type the name of the equipment.
Select the branch.
Choose a start and end date.
A list of equipment will appear. Make sure to select equipment for which the start and end date boxes are green.
Once the equipment is selected, click Add to Order. The equipment will now be included in the order.
To participate in the Referral Program, simply contact to receive an email that you can then forward to the Referred Customer that you wish to refer to Heyquip. The Heyquip team is available to answer any questions regarding the Referral Program and to help businesses get the most out of this program.
When you pass on a unique referral email, you are the actual sender of the messages and must comply with applicable law. You are prohibited from “spamming” anyone with referral invitations. Referrals must be created and distributed in a manner that is appropriate and customary for communications within your industry.
Any distribution of the unique referral email that could constitute unsolicited commercial email or “spam” under any applicable law or regulation is expressly prohibited. In particular, you must not:
distribute email referrals to strangers;
distribute email referrals to individuals under the age of majority in the recipient’s jurisdiction;
use bots or automated programs to distribute email referrals;
pay to advertise the email referral, or attempt to market, reproduce, sell or resell referral rewards to any third party whatsoever; and
Referrers who do not comply with applicable law, including anti-spam laws, are obligated to indemnify Heyquip against any liabilities, costs and expenses we incur as a result of such spam.
In addition, you must not:
violate the intellectual property rights of Heyquip;
act with intent to annoy, harass or abuse any other person;
participate in any inappropriate, uncooperative, disruptive, fraudulent, potentially fraudulent or unusual activity; and
act in a manner that in the sole discretion of Heyquip is deemed to be generally inconsistent with the intended purpose of the Referral Program.
You can easily add new items to your existing equipment to keep your inventory accurate and organized.
Access the Admin Portal.
( Need help to access it? )
In the gray sidebar, go to Inventory > Equipment. You will arrive at the inventory list.
Use the search bar to find the equipment you want to modify.
Type the name of the equipment in the small search bar at the top of the table.
Press Enter.
Select the equipment you want to modify.
Click on the magnifying glass icon to the left of the row to open the detailed equipment page.
In the Equipment to Rent section, click the Add button.
In the window that opens:Dans la section Équipements à louer, cliquez sur le bouton Ajouter.
In the window that opens:
Select the branch where the equipment will be located.
Enter a unique inventory ID.
If no ID exists, create one based on the numbering of other similar tools or machines.
Enter the serial number (optional).
Click Create, the new item will be automatically added and activated on the website.
Heyquip Inc. (“Heyquip”, “we,” “us”, “our”) offers you (“you”, “your,” or the “Referrer”) the opportunity to refer customers to us through a Referral Program (the “Referral Program”).
Our Referral Program is designed to reward you for referring new customers to us. It's a great way to earn Heyquip credits and help us grow our community so we can help more rental centers streamline their processes. By referring your friends and colleagues to Heyquip, you'll not only be helping them discover valuable tools for their rental businesses, but you'll also be earning rewards for yourself.
For every new customer you refer who signs up and becomes an active user of the Heyquip Platform (as defined in our Terms of Service), you'll receive Heyquip credits that can be used towards future purchases or services. It's a win-win situation – you're helping us grow, and we're rewarding you for your efforts.
Joining our Referral Program is simple and straightforward. All you need to do share our referral email. By participating in the Referral Program, you accept the following terms and conditions (the “Referral Terms”). We may update the Referral Terms at any time without prior notice. Any modifications of the Referral Terms will be posted on our website, and continued participation in the Referral Program shall constitute consent to the modified Referral Terms. Any capitalized term used herein but not defined shall have the meaning given to it in our Terms of Service.
Limitation of liability:
Heyquip is not liable to you for any business, financial or economic loss or for any consequential or indirect loss such as loss of reputation, lost bargain, lost profit, loss of anticipated savings or loss of opportunity arising as a result of any services Heyquip provide to you in relation to the Referral Program (whether suffered or incurred as a result of our negligence or otherwise), except in the case of fraud, willful concealment or theft. No claim may be brought against Heyquip in relation to your participation in the Referral Program more than 12 months following the date on which you last received a discount code. Nothing in the Referral Terms limits or excludes Heyquip’s liability caused by gross negligence or willful misconduct.
Indemnification:
Participants in the Referral Program agree to indemnify, defend, and hold Heyquip and its representatives and agents harmless from and against any and all third party claims, demands, liabilities, costs, or expenses, including attorney’s fees and costs, arising from, or related to any breach by the participant of the Referral Terms or any violation by the participant of applicable law.
Right to cancel, modify, exclude, or terminate:
Heyquip reserves the right to cancel, modify or terminate the Refrral Program at any time for any reason. Heyquip reserves the right to disqualify any participant at any time from participation in the Referral Program if we have a good faith belief that he/she has violated any of the Referral Terms.
Other terms:
If any provision in these terms are held to be invalid, void, or unenforceable, such provision (or the part of it that is making it invalid, void, or unenforceable) will be struck and will not affect the validity of and enforceability of the remaining provisions. The Referral Terms constitute the entire agreement between participants and Heyquip concerning participants’ use of the Referral Program. The failure of Heyquip to exercise or enforce any right or provision of the Referral Terms shall not constitute a waiver of such right or provision. If any provision of the Referral Terms is found by a court of competent jurisdiction to be invalid, the parties nevertheless agree that the court should endeavor to give effect to the parties’ intentions as reflected in the provision, and the other provisions of the Referral Terms remain in full force and effect.
Disputes related to the Referral Program will be governed by the laws of Quebec, Canada, and participants agree to submit any disputes to the exclusive jurisdiction of the courts of Quebec, Canada. By participating in the Heyquip Referral Program, you acknowledge and agree to these Referral Terms, structured to provide clarity and guidance on the program's operation and your involvement in it.
On the platform, there are two ways to change the name of an equipment type. You can either update it directly in the inventory table or edit it from the equipment’s detailed page.
Access the Admin Portal.
(Need help to access it? Click Here)
In the gray sidebar, go to Inventory > Equipment. You will arrive at the inventory list.
Use the search bar to find the equipment you want to edit.
Type the name of the equipment in the small search bar at the top of the table.
Press Enter on your keyboard.
Select the equipment you want to modify.
Double-click directly on the cell containing the name (French or English).
Edit the text. Your changes will be saved automatically.
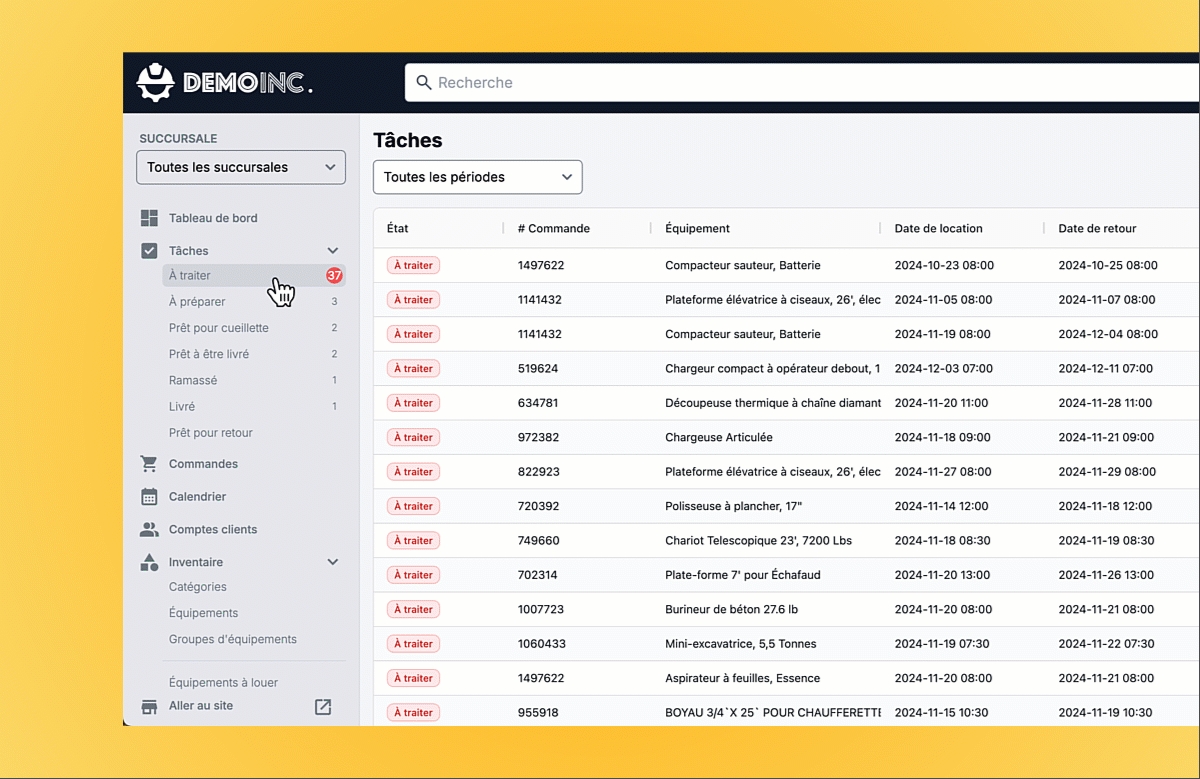
Easily get a comprehensive view of your ongoing rentals through the Tasks section in your Admin Portal. Track each rental’s current status and progress effortlessly.
Access the Admin Portal.
(Need help to access it? Click Here)
In the gray sidebar, go to Tasks > To Process. You will see a list of reservations awaiting action.
To Process tasks are reservations that require your approval.
To Prepare tasks are approved rentals that need to be prepared for delivery or pickup.
Ready for Pickup tasks are rentals ready for the client to collect.
Ready for Delivery tasks are rentals prepared for delivery to the client.
On rent tasks are rentals that have been collected by the client.
Delivered tasks are rentals that have been delivered to the client.
Ready for Return tasks are rentals waiting to be picked up by customers.
Managing your inventory list is simplified with Heyquip, allowing you to delete equipment that has never been rented.
Access the Admin Portal.
( Need help to access it? Click Here)
In the gray sidebar, go to Inventory > Equipment. You will arrive at the inventory list.
Use the search bar to find the equipment you want to modify.
Type the name of the equipment in the small search bar at the top of the table.
Press Enter.
Select the equipment you want to modify.
Click on the magnifying glass icon to the left of the row to open the detailed equipment page.
In the Equipment to Rent section, click on the inventory number and delete each item under that equipment.
Deactivate the item by clicking on the blue button at the top of the Store Equipment Info section.
The Delete Store Equipment button will appear in the bottom-right corner of the page; click on it.
Once all items under the equipment’s inventory are deleted, the Delete Equipment button will appear in the bottom-right corner; click on it.
**NOTE: This action permanently deletes the equipment and its inventory. This action is IRREVERSIBLE.
On the platform, there are two ways to change the price of equipment. You can update it directly in the inventory table or edit it from the equipment’s detailed page.
Access the Admin Portal.
( Need help to access it? Click Here)
In the gray sidebar, go to Inventory > Equipment. You will arrive at the inventory list.
Use the search bar to find the equipment you want to modify.
Type the name of the equipment in the small search bar at the top of the table.
Press Enter.
Select the equipment you want to modify.
Scroll the inventory table to the right to display the price columns.
Double-click on the cell corresponding to the price you want to change (e.g., daily or weekly price).
Enter the new amount, making sure to use periods instead of commas to indicate decimals.
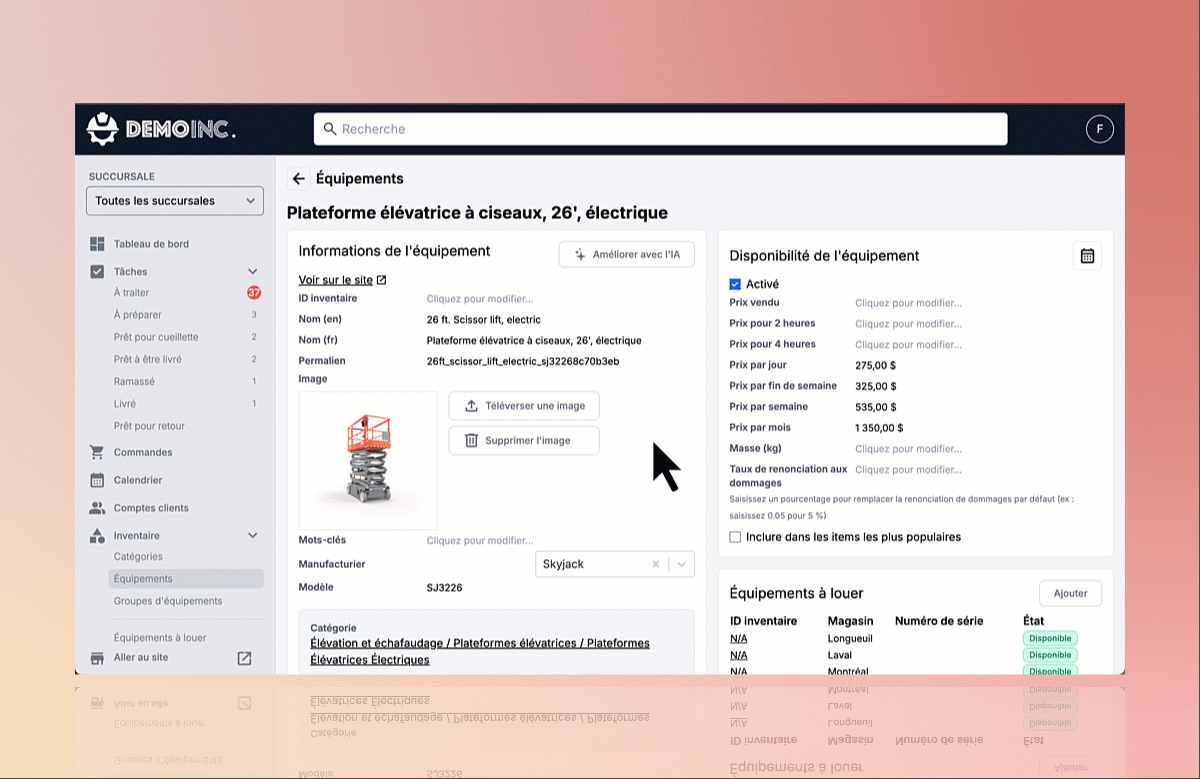
Photos on your website showcase your equipment and tools, helping clients easily visualize what they’re renting.
Access the Admin Portal.
(Need help to access it? )
In the gray sidebar, go to Inventory > Equipment. You will arrive at the inventory list.
Use the search bar to find the equipment for which you want to add an image.
Type the name of the equipment in the small search bar at the top of the table.
Press Enter on your keyboard.
Select the equipment you want to edit.
Click on the magnifying glass icon to the left of the row to open the equipment’s detailed page.
In the Equipment Information section, locate the Upload Image button and click on it.
A window will open:
Browse your files to select the desired image.
Click Open to upload the image.
The new photo will be automatically saved and will replace the previous one if applicable.
Vous pouvez facilement gérer vos catégories, sous-catégories et groupes via la section Catégories de votre portail administrateur.
Access the Admin Portal.
(Need help to access it? Click Here)
In the gray sidebar, go to Inventory > Categories. You will arrive at the category list.
To Add a Category :
Click on the “+” button next to Categories.
In the window that opens
Enter the name of the new category in French (Name (FR).
Enter the name of the new category in English (Name (EN).
Once you’ve entered the names in both languages, you will be directed to the category’s detailed page.
To add equipment to a category:
In the Equipment section of the category’s detailed page, click Add Equipment.
Enter the name in both English and French.
Select the manufacturer (optional).
Enter the equipment’s model number (optional).
Click Create to save the equipment.
** NOTES : You will need to add inventory to the equipment for it to appear on the website. Here’s how to do it.
This function creates new equipment in the inventory. If you want to add existing equipment to a category, access the equipment’s detailed page. Refer to Step 11 for instructions.
To add a subcategory to a category:
In the category’s detailed page, locate the Add Subcategory button in the Subcategories section.
Enter the name in both English and French for the new category
Click Create to save the subcategory.
To add equipment to a subcategory:
In the Equipment section of the subcategoryy’s detailed page, click Add Equipment.
Enter the name in both English and French.
Select the manufacturer (optional).
Enter the equipment’s model number (optional).
Click Create to save the equipment.
**NOTES : You must add inventory to your equipment for it to appear on the website. Here’s how to do it.
This function creates new equipment in the inventory. If you want to add existing equipment to a category, access the equipment’s detailed page. Refer to Step 11 for instructions.
To delete a category:
Access the category’s detailed page.
Check the Subcategories section for any associated subcategories, if there are subcategories:
Click on the subcategory’s name to access its detailed page.
At the top of the page, click Move to Root to unlink the subcategory so you can delete the main category.
Check the Groups section for any associated groups, if there are groups:
Click on the group’s name to access its detailed page.
At the top of the page, click Move to Root to unlink the group.
Check the Equipment section for any associated equipment, if there is associated equipment:
Click on the equipment’s name to access its detailed page.
In the Category section, click Remove from Category to unlink the equipment. Be sure to reassign the equipment to another category.
Return to the category’s detailed page and locate the Remove Category button at the bottom-right of the screen.
**NOTE : This action permanently deletes the category completely from the platform and is IRREVERSIBLE.
To delete a subcategory:
Access the subcategory’s detailed page.
Check the Subcategories section for any associated subcategories, if there are subcategories:
Click on the subcategory’s name to access its detailed page.
At the top of the page, click Move to Root to unlink the subcategory so you can delete the main category.
Check the Groups section for any associated groups, if there are groups:
Click on the group’s name to access its detailed page.
At the top of the page, click Move to Root to unlink the group.
Check the Equipment section for any associated equipment, if there is associated equipment:
Click on the equipment’s name to access its detailed page.
In the Category section, click Remove from Category to unlink the equipment. Be sure to reassign the equipment to another category.
Return to the subcategory’s detailed page and locate the Remove Category button at the bottom-right of the screen.
**NOTE : This action permanently deletes the subcategory completely from the platform and is IRREVERSIBLE.
To modify a subcategory:
Click on the subcategory you wish to edit in the Subcategories section.
Once the subcategory’s detailed page opens, locate the fields Name (FR) and Name (EN).
Click on the name in each language field and type the new name. The changes will be automatically saved on the platform.
To add a subcategory to existing equipment:
In the Category section (located in the middle-left of the equipment’s detailed page), click Modify or Add.
A list of categories and subcategories will appear.
Select the appropriate category or subcategory for the equipment.
Click Select at the bottom of the list to save your choice. The equipment will now be associated with the selected category or subcategory.

Managing your inventory catalog with Heyquip is designed to be both intuitive and efficient. Whether it's adjusting prices, updating descriptions, or adding new equipment, Heyquip provides the necessary tools to keep your inventory organized and optimized, while simplifying your daily operations.
In this section, learn how to effectively manage your inventory catalog.
Navigate the admin portal to perform key functions such as disabling site equipment, organizing equipment into categories, and managing manufacturer details. With step-by-step instructions and helpful tips, streamline your inventory management to ensure accurate and up-to-date listings, maximizing both accessibility and operational efficiency.
Viewing or downloading a specific invoice is quick and easy. With just a few clicks, access all the details you need to ensure thorough tracking of your transactions.
Access the Admin Portal.
(Need help to access it? Click Here)
In the gray sidebar, go to Orders. You will see the list of your orders (rentals).
**NOTE : If you have never processed any transactions on the platform, the order history will be empty.
Use the search bar to find the order you need.
Double-click on the order line to access the full order details.
Click on the Download Invoice button in the middle-right section of the details page.
Change Equipment Names
Change Photos
Change Prices
Change Manufacturers or Models
Add Descriptions
Add Inventory to Your Equipment Types
Add Equipment Types
Remove Equipment from the Website
Delete Equipment Inventory
Access the Equipment Availability Calendar
Edit Categories, Subcategories, and Equipment Groups


Voici les étapes pour récupérer les clés d'API Stripe nécessaire pour mettre votre plateforme transactionnelle en marche.
Log in to your Heyquip admin portal and follow these steps to retrieve your Stripe API keys.
Log in to your Stripe account:
Open your browser and go to https://dashboard.stripe.com/login.
Enter your email and password, then click Sign in.
After logging in, you’ll land on the Stripe main dashboard. On the left-hand sidebar, scroll down to the Developers section.
Click on Developers to open the submenu.
In the Developers submenu, click on API keys.
On the API keys page, you’ll see two types of keys:
Publishable key: Usually starts with pk_live_ or pk_test_.
Secret key: Usually starts with sk_live_ or sk_test_.
To view the Secret key, click on the eye icon or the Reveal key button.
**NOTE: For security reasons, Stripe allows you to view your API keys only once. If needed later, copy them to a secure location (but only if you’re sure it’s safe; otherwise, it’s not recommended).
Copy your Secret key and paste it into the designated field in your Heyquip admin portal.
It will look like this: sk_test_xxxxxxxxxxxxxxxxxxxxxxxxxx.
To view the Publishable key, click on the eye icon or the Reveal key button.
Copy your Publishable key and paste it into the designated field in your Heyquip admin portal.
It will look like this: pk_test_xxxxxxxxxxxxxxxxxxxxxxxxxx.
If a client creates a reservation and later wants to add items, you can easily add equipment to the reservation directly from the Admin Portal in the Orders section.
Access the Admin Portal.
(Need help to access it? Click Here)
In the gray sidebar, go to Orders. You will see the list of orders.
Use the search bar to locate the order you need.
Double-cliquez sur la ligne de la commande pour accéder à la fiche de la commande.
You will then be redirected to the order details page. Click on + Rental or + Purchase to add equipment to the order.
In the Add Equipment to Order window:
Type the name of the equipment.
Select the branch.
Choose a start and end date.
A list of equipment will appear. Make sure to select equipment for which the start and end date boxes are green.
Once the equipment is selected, click Add to Order. The equipment will now be included in the order.


Let your clients know that their equipment reservations are automatically approved.
Access the Admin Portal.
(Need help to access it? Click Here)
In the gray sidebar, go to the Tasks section and click on To Process. This will take you to the table of tasks awaiting validation.
A To Process task represents a reservation request that requires your approval to be officially confirmed with the client.
Use the dropdown menu to filter tasks by time period. Click on All periods, then select the appropriate time period:
Before today
Today
Tomorrow
This week
In the future
Scroll through the list to locate the desired task.
Double-click on the task to open its detailed file.
In the central To Process section, click the black Accept button to approve the reservation.
Upon acceptance, the client will receive a confirmation email.
If you click Reject, the client will be notified by email that their reservation has been denied.