Manage Orders
At Heyquip, we understand that every booking matters and that each minute spent manually managing orders could be better spent elsewhere. That's why our platform allows you to streamline your operations by creating, modifying, and tracking your orders.
Discover in this section how Heyquip helps you organize reservations, avoid inventory conflicts, and maintain control over your operations. A well-oiled system means more time for your clients and more energy to grow your business.


View All Reservations
Easily get a comprehensive view of your ongoing rentals through the Tasks section in your Admin Portal. Track each rental’s current status and progress effortlessly.
Access the Admin Portal.
(Need help to access it? Click Here)
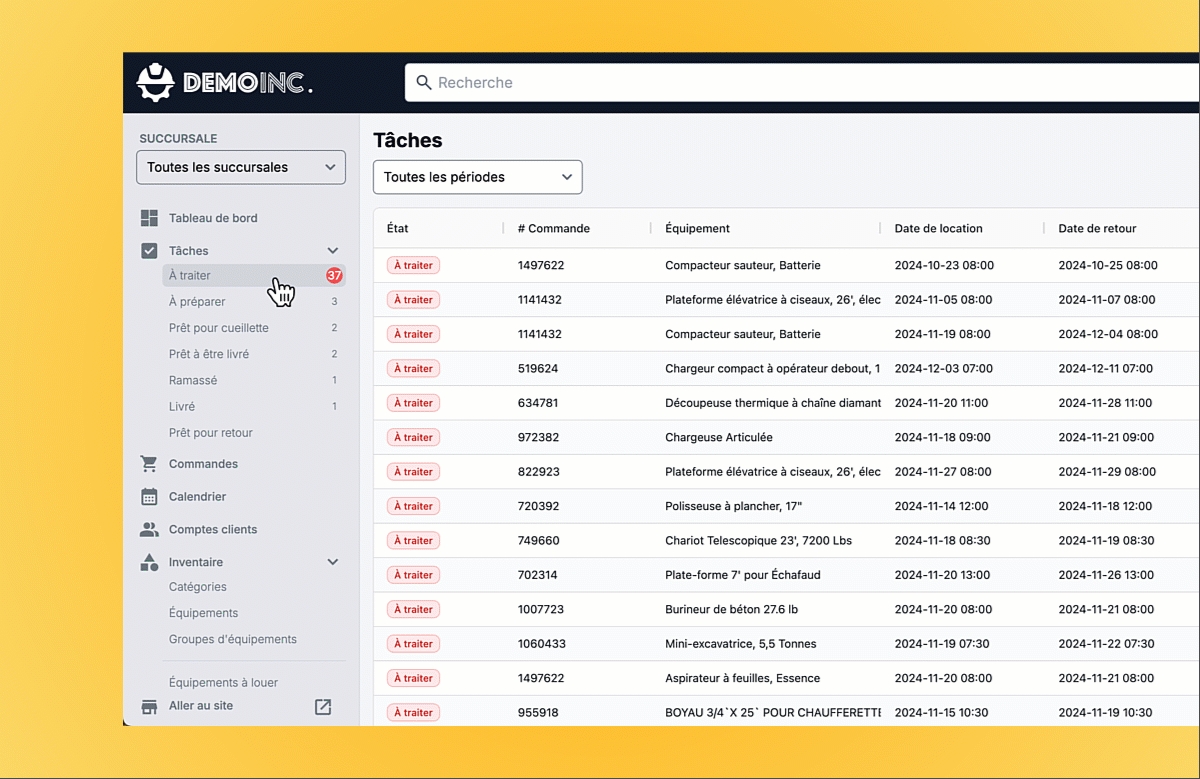
In the gray sidebar, go to Tasks > To Process. You will see a list of reservations awaiting action.
To Process tasks are reservations that require your approval.
To Prepare tasks are approved rentals that need to be prepared for delivery or pickup.
Ready for Pickup tasks are rentals ready for the client to collect.
Ready for Delivery tasks are rentals prepared for delivery to the client.
On rent tasks are rentals that have been collected by the client.
Delivered tasks are rentals that have been delivered to the client.
Ready for Return tasks are rentals waiting to be picked up by customers.
Create a Reservation at the Counter
You can create a reservation for a client either at the counter or over the phone.
Access the Admin Portal.
(Need help to access it? Click Here)
In the gray sidebar, go to Orders. You will see the list of orders.
Click on the Add button in the top-right corner of the window.
In the window that opens:
Enter the client’s information:
First name
Last name
Email address
Phone number
Company (optional)
Click Save.
You will then be redirected to the order details page. Click on + Rental or + Purchase to add equipment to the order.
In the Add Equipment to Order window:
Type the name of the equipment.
Select the branch.
Choose a start and end date.
A list of equipment will appear. Make sure to select equipment for which the start and end date boxes are green.
Once the equipment is selected, click Add to Order. The equipment will now be included in the order.
Add to an Existing Reservation
If a client creates a reservation and later wants to add items, you can easily add equipment to the reservation directly from the Admin Portal in the Orders section.
Access the Admin Portal.
(Need help to access it? Click Here)
In the gray sidebar, go to Orders. You will see the list of orders.
Use the search bar to locate the order you need.
Double-cliquez sur la ligne de la commande pour accéder à la fiche de la commande.
You will then be redirected to the order details page. Click on + Rental or + Purchase to add equipment to the order.
In the Add Equipment to Order window:
Type the name of the equipment.
Select the branch.
Choose a start and end date.
A list of equipment will appear. Make sure to select equipment for which the start and end date boxes are green.
Once the equipment is selected, click Add to Order. The equipment will now be included in the order.
View Reservations in a Calendar
You can view your reservations in a calendar format. Focus on specific time periods or customize the view to suit your preferences.
Access the Admin Portal.
(Need help to access it? Click Here)
In the gray sidebar, go to Calendar. You will see a calendar displaying all ongoing reservations.
An ongoing reservation is a rental that has not yet been returned by the client.
You can choose your preferred view:
Daily
Weekly
Monthly
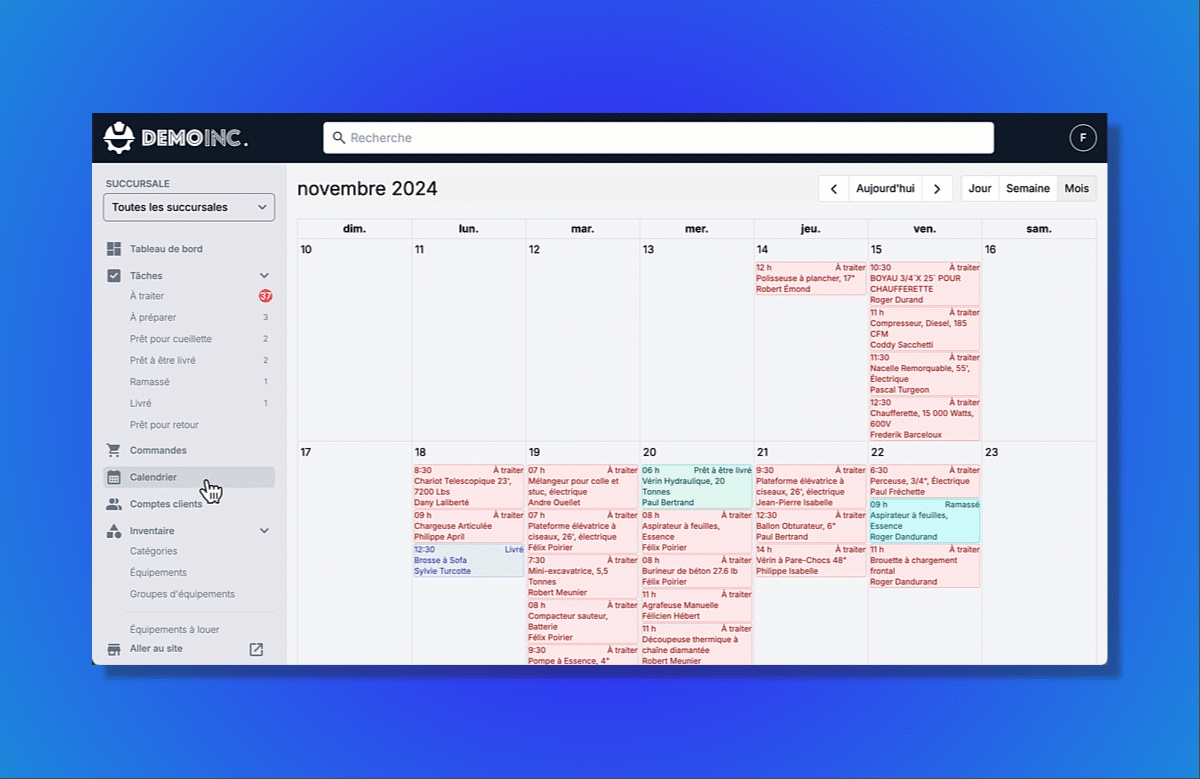
Simply click on the white boxes in the top-right corner of the window.
You can scroll through the calendar using the arrows located in the top-right corner of the window.
Confirm Reservations
Let your clients know that their equipment reservations are automatically approved.
Access the Admin Portal.
(Need help to access it? Click Here)
In the gray sidebar, go to the Tasks section and click on To Process. This will take you to the table of tasks awaiting validation.
A To Process task represents a reservation request that requires your approval to be officially confirmed with the client.
Use the dropdown menu to filter tasks by time period. Click on All periods, then select the appropriate time period:
Before today
Today
Tomorrow
This week
In the future
Scroll through the list to locate the desired task.
Double-click on the task to open its detailed file.
In the central To Process section, click the black Accept button to approve the reservation.
Upon acceptance, the client will receive a confirmation email.
If you click Reject, the client will be notified by email that their reservation has been denied.
Change Reservation Status
Move your rentals through the process by updating their status, ensuring a clear overview of your operations at all times.
Access the Admin Portal.
(Need help to access it? Click Here)
In the gray sidebar, go to the Tasks section and click on the Tasks button. This will take you to the table of tasks awaiting validation.
Use the dropdown menu to filter tasks by time period. Click on All periods, then select the appropriate time period:
Before today
Today
Tomorrow
This week
In the future
Scroll through the list to locate the desired task.
Double-click the task to open its full details. In the central section, titled according to the task status, click on the black box corresponding to the next step. The task will automatically advance to this stage in the tasks table.